Here is a guide to clone a WordPress(.org) blog, on the same server, 10 steps, on Linux, You’ll definitely need admin access to the blog itself, and probably to the database and server too, depending on your setup. I did this recently as I needed a copy of an existing production site, to hack on. If you don’t fancy doing it the quick-and-dirty way, there are, I’m sure, even quicker (and cleaner) ways, by installing plugins.
In the following instructions, substitute X and Y for your existing and new blog, respectively.
0. Do a backup of your current website, like you do normally for an upgrade or archiving, in case anything goes wrong. e.g. under Tools > Export in the WordPress admin interface.
1. Copy all the files:
cp -r /home/~username/www/blog_X /home/~username/www/blog_Y
2. Edit wp-config.php in your new blog directory:
Change:
$table_prefix = 'wp_X_';
to:
$table_prefix = 'wp_Y_';
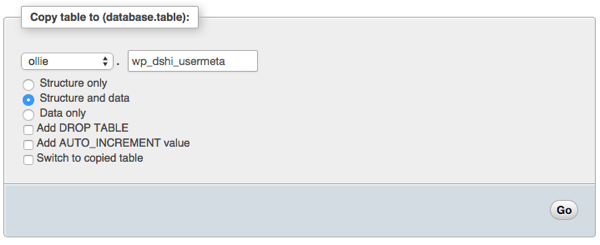
3. Copy all the database tables (prefixed with wp_X_). The new ones should have a prefix wp_Y_ instead. I used the Copy functionality under the Operations tab in phpMyAdmin (see screenshot below).
4. Edit wp_Y_options:
update wp_Y_options set option_name = 'wp_Y_user_role' where option_name = ' wp_X_user_role';
5. Edit wp_Y_options:
Edit the option_value for rows with option_name values of siteurl and home, pointing them to the new location – mine are the same but one might be different, e.g. if you have your WordPress core files in a subdirectory relative to the directory for the site entry-point on the web.
update wp_Y_options set option_value = 'http://your_server.com/~username/wp_Y' where option_name = 'siteurl';

update wp_Y_options set option_value = 'http://your_server.com/~username/wp_Y' where option_name = 'home';
There may be other rows referencing your old blog name, but these are probably from plugins and therefore probably don’t need to be changed.
6. Edit wp_Y_usermeta:
update wp_Y_usermeta set meta_key = replace(meta_key, 'wp_X', 'wp_Y');
(You can edit the affected rows manually, but I had a lot to do – there’s around 5 for each user.)
7. Drop force-upgrade.php in the same directory as wp-config.php and run it from your browser. This rebuilds caches/hashes stored in some of the tables. You can run it repeatedly if necessary, (e.g. if you missed a step above), it shouldn’t do any harm.
You can find force-upgrade.php here.
8. Delete force-upgrade.php. Leaving it is a security risk.
9. Log in to your blog in the new location, as normal. Usernames and passwords should be preserved.